Overview
SmartScope is a conditional logic driven, question and answer based estimating solution for large loss claims. It is a tool meant to create accelerated, efficient, and detailed estimates which can otherwise be a complex and time-consuming process.
The current questionnaire options for SmartScope include Residential Total Loss estimation and Commercial Total Loss estimation. These questionnaires can be used to build an estimate for an entire structure, from the foundation up through the roof, encompassing virtually every part of the structure (some areas are not included in the questionnaire currently, an explanation of which will be provided further into this guide). This is different from an assembly, which is targeted fora specific loss scenario and/or one area of damage.
Access
If a company does not currently have access to SmartScope, they can contact their Customer Success representative for details on how to access the feature in their company account.
If a company has access to SmartScope, the questionnaire(s) will be loaded for the company at the version level of the claims database. This means, when turned on, the questionnaire(s) will be loaded at the current version level of the claims database.
As new versions of the claims database are released monthly, the questionnaire will continue to be available. Potential changes to the questionnaire are released with each new version of the claims database and may be made as frequently as monthly to reflect database updates for line-item availability(addition and subtraction) and other potential database updates. Improvements are oftentimes made in the monthly version updates as well, both to streamline user experience and to reflect client feedback requests. When an improvement is released and how long it takes to deploy is contingent on the complexity of the change and what the software is currently capable of doing.
Required Information
Before starting the questionnaire, users are required to add a Roofplan to the estimate. This can be either an imported external provided aerial imagery file(such as Eagleview or Hover), or a manual, user drawn Roofplan in Cotality™ Estimate™. The calculations for the roof will pull from the Roofplan, so it is necessary to function properly.
Note: Interior floorplans and exterior plans should not be added or imported into the questionnaire. An imported diagram for anything other than a Roofplan will result in incorrect quantity calculations.
Users are also required to have the SF of foundation area. This can be confirmed verbally from the property owner, manually obtained from an on-site inspection, or determined from the Roofplan itself, within the questionnaire (this will be explained further later).
Starting the Questionnaire
| In Estimate, SmartScope can be found in the Claim Navigation Panel: | Once SmartScope is selected, the following dialogue box will appear. To create a new questionnaire, select “New”. If available, choose between Residential and Commercial. |
 |  |
This will launch the questionnaire. If multiple questionnaires exist, a dropdown will appear to select the one needed for the estimate. The other commands exist for the following reasons:
- “Open” exists if the user exits the questionnaire and needs to return to it later. User progress will be saved.
- “Delete” will remove the questionnaire completely, where it can be re-started as “New”.
- “Close” will close the dialogue box.
After the questionnaire is launched, the landing page will pull the loss summary information from the loss summary page for the claim.

Navigating the Questionnaire
To navigate the questionnaire, there are two options. Use the left-hand navigation tree to go directly to the section needed by selecting that context(ex. Roof) or use the next/previous buttons in the upper right hand of the screen to move one context at a time.
Navigating through all the contexts and answering all applicable questions are imperative to producing an accurate estimate.
To define the structure composition itself, the user first needs to answer, “How many buildings?”. Depending on the loss scenario, there may be more than one structure. Use the arrows or enter a number to define the number of buildings. If adding a second building, a second set of contexts will appear.

Click “Next” or select the “Building” context to proceed. On the building page, the user will now see the beginning questions to complete the questionnaire. This is where it is possible to rename the building to something else (ex. Home). The second question is: “What is the SF of the foundation (including attached garage)?” This can be entered manually, or it can be added from the Roofplan. To add the SF of foundation from the Roofplan, first navigate to the “Roof” context. Select the Roofplan to import from the claim file into the questionnaire, using the dropdown. Then select the checkbox that says, “Use this diagram to calculate building surface”. Fields will gray out after the Roofplan has been imported into the questionnaire. This is normal and expected. The fields are not intended to be used, as adding a Roofplan to the claim and the questionnaire is required. The fields remain as they are hardcoded into the system and do not disappear. They were originally present to allow a user to manually build a Roofplan in the questionnaire, but this is no longer a necessity or a reasonable use case with the advent of aerial imagery.
Navigate back to the “Building” context and proceed with the questionnaire. If the Roofplan was used to generate the SF of foundation, the user will now seethe field grayed out and a note inserted that says, “Roof used for the surface calculation”.
This field is no longer able to be manipulated. If it needs to be manipulated, uncheck the box in the “Roof” context and enter manually. Further questions in that section will help build the information needed for quantity outputs of the questionnaire. This occurs in the background and will not be visible to the user. For example, “What is the shape of the building?” adds various multipliers for added complexity of the structure. “How many stories does the building have?” will operate similar to how “How many buildings?” functions. If the user adds a second story, a second set of story contexts will appear. “Does the building have a basement” and “Does the building have an attic” will remove or add those contexts from the questionnaire and navigation tree as well. It is important to answer all these questions every time a questionnaire is used. If there is no basement, the option needs to be unselected or it will lead to an inaccurate estimate.

Building Context
After the user has completed the initial parts of the questionnaire, navigate through each group, each question, and each context, starting with the “Building” context.
General Structure Details (Structure Defaults)
Select the Type of Structure and the General Quality of Construction. General Quality of Construction will set a structure level default for the type of line item populated in the estimate; meaning if selecting “Good”, good grade line items will populate into the estimate by default. This can be further changed at various levels of the questionnaire, including the “Room” context, or at the individual question level, if applicable. For example, the user can select “Good” as the structure default, but if the building has a remodeled room (like a Kitchen for example) that is better represented by “Excellent”, this can be changed for that room at the room level, while retaining the “Good” default for all the other rooms.
Foundation
Answer the questions in the foundation section if the foundation (floors or walls)is affected in the loss. If the foundation is not damaged, and does not require replacement, the user can leave the section with the default answer of “No”. If the foundation walls are impacted, make sure to select either a basement or a walkout basement as the foundation type. The walls will be addressed in the "Basement” context. The foundation floor/slab will be addressed in the "Building” context.
Walls/Ceilings/Finish Carpentry/Framing (Structure Defaults)
The following sections will set structure level defaults for each room. This is to avoid having to enter this information within each room repeatedly. Though the user is selecting structure defaults that carry over into each room, this can be modified at the room level to reflect the accurate scope for each.
Basement Attic Context
Do not import a foundation /basement to the basement context, or an attic to the attic context. An imported diagram for anything other than a Roofplan will result in incorrect quantity calculations.
If the user has indicated there is a basement and/or attic present, they will need to account for all rooms in these sections (whether finished or unfinished) to properly capture scope within these levels and ensure correct quantity generation.
If there is an entirely unfinished attic with nothing other than framing/insulation, the user does not need to add a room.
If the basement and/or attic is smaller than the SF of foundation (does not exist above/below the garage, for example), the user can update the percentage of the foundation area to apply to this level of the home. For example, the user can enter 90% (or whatever the user defined percentage is) if the basement and/or attic should only use 90% (or whatever the user defined percentage is) of the foundation area, which is then used to define room/quantity calculations.

Exterior Context
Do not import an exterior plan to the exterior context. An imported diagram foranything other than a Roofplan will result in incorrect quantity calculations.
If the loss scenario involves a 1.5 story home or similar, please review the quantities generated after the questionnaire is completed and adjust based on any available information. Answer all applicable questions in this section. Add porches at the end (up to a max of 4) whether they are open or covered. The roofing for these porches will be covered under the “Roof” context. Decks are not included in this questionnaire. After estimate generation, use the deck assembly to add if needed.
Roof Context
If the user has not imported the Roofplan into the questionnaire yet, please do so here.
Roof framing (rafter or truss) will not be entered in the questionnaire, rather, it should be added after estimate generation to replace the $0 placeholder that is generated with the estimate. This is to allow the user to leverage the diagram to use the Rafter or Truss system line items that are needed to complete this portion of the estimate. It is easier and more intuitive to add them after the questionnaire instead of within the questionnaire so the user can visually confirm complexity and pitch of each roof facet.
Answer all applicable questions in this section.
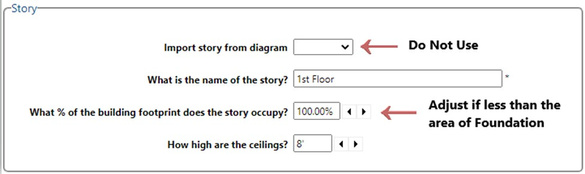
Floor/Story (1st Floor, 2nd Floor, etc) Context
Do not import a floorplan to the story level context. An imported diagram for anything other than a Roofplan will result in incorrect quantity calculations. Selections made at this level, will carry into each of the rooms. Users can make adjustments at the room level if the defaults selected are not applicable for every room. Users will define the type of ‘room’ at the room level so the proper questions will appear to the user. For example, within the “Room” context, a selection of “Kitchen” can be made, which will allow questions specific to the "Kitchen” to appear. On this screen (the “Story” context), the user is simply defining the quantity/size of rooms for the story. This is further explained in the questionnaire:

The rooms use the overall SF of foundation to create quantities for each room based on the ratio of rooms within the SF of foundation for that level of the building, as well as accounting for the percentage of building footprint that the story occupies. If the story is less than the area of foundation, then reduce the percentage from 100%.
Room Context
Answer the initial questions in each room. The room type question is not available in this questionnaire and will not function. This is normal and expected. The other questions will help build quantities of line items generating from this room.

For windows, choose the options that are closest to the applicable options for the loss. These are built-in, hardcoded questions, so the quantities will automatically deduct from the line items populated during estimate generation.
For doors, choose options that are closest to the applicable options for the loss. These are not built-in questions, but the quantities will reduce for these areas based on formulas built into item quantity generation. In the “Framing” section, the default selections the user made at the “Building” context level will carry into each room. If that room has different framing, please change the selections, or clear them if the room does not have the applicable type of framing.
In the “General Room Details” section, this is where the user can define the type of room which will create the conditional logic driven set of questions for this type of room. Some default answers will be present already, these can be changed or turned off if they do not apply. The general quality of construction question here will allow for the override of the structure default selection, if needed.
Answer all applicable questions in each room to fill in all the information needed to generate the room. If the question is not applicable, the user can leave the answer blank, and nothing will populate for items tied to that selection.
Unfortunately, at this time, the software is not able to copy one rooms selections to the next room, so each room will need to be filled out as accurately as possible to generate the correct scope. At the bottom of each room (where applicable), there is a question asking, “Would you like to use the default selections for Walls, Ceilings and Finish Carpentry?”. If the user leaves the selection as ‘Yes’, then the structure defaults selected in the “Building” context will be used for this room. If user changes the selection to ‘No’, the questions(and some additional questions) will appear and allow for changes to that room.

Additional Tips/Tricks/Reminders
Red guidance notes have been added throughout the questionnaire to help explain many of the pieces that are listed in this guide, as well as additional points of note to consider. It is important to stop and read them when completing the questionnaire.
Questions with * (asterisks) are mandatory and the questionnaire will not allow the user to generate an estimate until they are answered. This is similar behavior to assemblies and other questionnaire types. Once the user has completed the questionnaire, and generated the estimate, the user can still go back into the questionnaire and see which options they have selected. If the user changes an option, and re-generates the estimate, a new estimate and new diagrams will be created so as to not overwrite the previous generated estimate (this is normal and expected behavior of the software). If the user wishes to make a change, it may be better to modify this in the generated estimate, otherwise they should delete the previous generated estimate and diagrams, so it is not duplicated within that claim.
Closets/Pantries under 36 SF can be added at the room level and do not need to be added as separate rooms. Closets/Pantries over 36 SF, hallways, garages, etc. should be added as separate rooms. While no ‘diagram’ is technically generated upon estimate creation, boxes detailing each room and/or context will generate with the items for that section included. If the user right clicks and select properties, they can see most of the measurements SmartScope is using to create the scope within that context. Some of the sections will not be present, as they may be tied in with formula instead of built-in features.
Future versions of SmartScope will be timed with database releases, ifapplicable.

Review/Edit/Finalize
It is important to review the estimate that has generated, ensure the quantities/items make sense, and to review for any potential final changes and/or additions.
 This is where the user would add roof framing or decks, if applicable. Debris removal, overhead and profit, coverage, and depreciation are not considered in this questionnaire, these are properties that will need to be added/adjusted after estimate generation. Sometimes based on selections, the user may see negative quantities (this is not common). It is important to either adjust these line items or delete them if they are not applicable. Often with a negative quantity, this is due to user defined windows/doors/openings exceeding the area of wall; or an area of overlap of two materials where they both would not exist. Please review if this happens as it is possible the user has defined too many openings and/or made selections that are overlapping with one another. A valuable tool that may help users, is the “Replace With” feature in the software.
This feature allows users to swap an item with any other item in the database and retain the quantity calculations and any other user entered information from the replaced item. If the questionnaire does not have the specific option needed, using “Replace With” can be a valuable tool to help make changes.
Was this article helpful?
That’s Great!
Thank you for your feedback
Sorry! We couldn't be helpful
Thank you for your feedback
Feedback sent
We appreciate your effort and will try to fix the article